This section outlines the steps for using CIS Assessment Feature of SecID. SecID currently supports assessments for 37 different technologies, and the process may vary depending on the specific technology being assessed. Please refer to the following sections for detailed guidance on executing assessments with SecID.
SecID is a web-based application designed to assess a variety of technologies. Before initiating an assessment, you must fulfill certain prerequisites and prepare the assessment environment. At a high level, the process involves the following steps:
Before performing assessments with SecID, the environment must be properly prepared. This preparation involves installing the necessary modules and tools, and for certain technologies, creating an Azure Entra application with the required permissions. Note that not all technologies require an Entra app. The table below indicates which technologies require an Azure Entra App for assessment.
| Technology | Can use Login Prompt? | Requires Azure Entra App or Credential? |
| Microsoft 365 Assessment | Yes | Yes (required for continuous assessment) |
| Microsoft Azure CIS Assessment [ includes all other Azure CIS Assessments such as Storage, Compute, AKS, and Database ] | No | Yes |
| Microsoft Azure Entra ID Assessment | No | Yes |
| Active Directory Assessment | Locally Logged On | No |
| Microsoft Intune iOS Assessment | No | Yes |
| Windows Intune 10-11 Assessment | No | Yes |
| Microsoft Azure Infra Assessment | No | Yes |
| Microsoft IIS Assessment | Yes | No |
| Microsoft DHCP Assessment | Yes | No |
SecID leverages the Microsoft Graph API and various vendor tools to perform assessments. Before using SecID, ensure that all required modules and tools are installed.
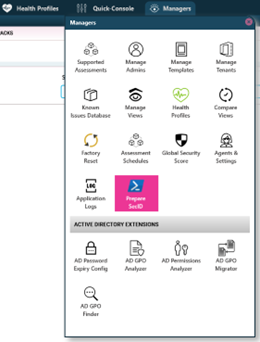
The required modules vary based on the technology being assessed. SecID includes a built-in tool that analyzes your environment and identifies the necessary modules for installation. To begin preparing the SecID environment, navigate to Managers, then click on Prepare SecID, as shown in the screenshot below:
The Prepare SecID screen will open.
On the Prepare SecID screen, expand the Install Modules/Tools section, select the relevant technology, and then click Show Required Modules, as illustrated below:
As shown in the screenshot above, we selected the Microsoft 365 technology. Clicking the Show Required Modules button displays a list of required modules along with their exact versions needed to run the assessment. This action checks the current module status and presents the results in the middle pane. If you wish to install the modules directly from the Prepare SecID screen, click the Install Modules button. SecID will automatically install all necessary modules for the selected technology and notify you once the process is complete. Alternatively, if you prefer to install the modules manually, click the Install Manually button. This will display a list of required modules for manual installation, as shown below:
Note: If you’re conducting assessments for multiple technologies, you can select multiple technologies in the Select Technologies section and then click the Show Required Modules button to view the list of required modules and tools.
If you’re conducting an assessment for a technology that requires the creation of an Azure Entra App, make sure to create or update the Azure Entra App with the necessary permissions. SecID provides functionality to either create a new Azure Entra App or update an existing one with the required permissions. To view the list of permissions needed for the technology, expand the Update/Create Entra App section, select the technologies from the list, and click the Show Required Permissions button, as shown below:
As shown in the screenshot above, we selected Microsoft Azure-All, which displays the list of permissions required to be assigned to the Azure Entra App before the assessment can proceed successfully. You have the option to assign all required permissions to a single Azure Entra App or to multiple Azure Entra Apps. For example, if you are conducting assessments for Microsoft 365, Azure, Intune, Entra ID, Azure Infra, and Intune iOS, you can select all these technologies and then click Show Required Permissions to view the complete list of permissions needed for the selected technologies.
Once you know the list of permissions required in the middle panel, you have two options:
Creating a New Azure Entra App
To create a new Azure Entra App with the required permissions, provide the following inputs:
As shown, you will need to provide details such as the App Display Name, Description, Tenant ID, and Subscription ID. Once you’ve entered the required information, click the Create/Update Entra App button to create the app and assign the necessary permissions. When creating a new Entra App through SecID, you will be prompted to enter a Global Admin account. This account must have the appropriate permissions to create the Entra App and assign the required permissions.
To view the app creation log, click the Creation Log button. This will display the log, as shown below:
Updating Existing Azure Entra App
If you prefer to update an existing Azure Entra App with the required permissions instead of creating a new one, select Update Existing Entra App from the Select an Option menu, as shown below. Then, click the Get All Apps button to view the list of apps already registered in the Tenant.
Once the list of apps is displayed, select the Entra App you wish to update with the required permissions. Enter the necessary details, such as the Tenant ID and Subscription ID, and then click the Create/Update Entra App button to apply the required permissions to the selected app.
If you prefer to assign the required permissions manually via the Azure Portal, click on the Permissions References node to view the list of permissions for each technology, as shown below:
The following PowerShell modules must be installed on the SecID computer to execute all tests. Open a PowerShell window with elevated privileges and run the following commands:
Each Assessment Technology supports two authentiction methods: 1. Executing Assessment by Entering Credentials in Authentication Prompt and 2. STORED-CRED.
Entering Credentials in Authentication Prompt:
STORED-CRED
Note that in the latest version of SecID, customers can now manage licenses through a separate console. All licenses for technologies must be added to SecID before they can be used. For instance, if you’ve purchased a license for the M365 Tenant Assessment, the license code provided by the DynamicPacks Team needs to be added to SecID, and a corresponding assessment license profile must be created.
To add an Assessment License Profile, go to Managers and click on the Agents & Settings button, shown
From the Agents & Settings screen, navigate to the Manage Technology Licenses screen by clicking the Manage Technology Licenses button.
To add a new license code, provide the following inputs:
Once done, click on “Add” button to add the license entry.
Once the license profile has been created, you can see it displayes that tenant it belongs to and other licensing details such as start date, days allowed and so on.
Similarly, you can create license profiles for other technologies as needed.
Note that SecID supports a wide range of technologies, with a total of 37 technologies currently available. Before you can perform an assessment, you must register the target technology or tenant under SecID’s management. To register a tenant, go to Managers and click on the Manage Tenants button.
The Manage Tenants screen will display the tenants you’ve already registered, along with options to add a new tenant. To add a new target or tenant, click the Add New Target/Tenant button, as shown below:
As shown, the left side of the screen lists all the technologies supported by SecID, while the right side prompts you to enter tenant details specific to the selected technology. These details vary depending on the technology. For instance, when registering for a Microsoft 365 Tenant, you will be required to provide details such as the Global Reader account, the M365 on Microsoft domain name, and other relevant information. This section provides details for all tenants and their specific requirements:
To register a Microsoft 365 Tenant, click on Microsoft 365 CIS in the left pane. Wait for the process to populate the required tenant details. For Microsoft 365, you will need to enter the details as shown below:
Note that you are requierd to fill following details before a Microsoft 365 Tenant can be added:
Rest of the fields will be populated when you select the profiles in the right pane under “Select Applications Profiles to Tenant”.
Please note that for each tenant, you must associate the applicable profiles. Depending on the connection type, you are required to select at least two profiles for each tenant, as listed below:
Once you have filled in the necessary information for the tenant, click the Add Tenant button to add the tenant under SecID’s management. You should then see the list of registered tenants when you click the Manage All Tenants button, as shown below:
Once the tenants are registered, you can create Assessment Views for executing assessments. Note that an Assessment View contains the following information:
To create an Assessment View, go to the Managers screen and click on the Manage Views button, as shown below:
In the Manage Views screen, click on the Add Single-Column View button, then provide the necessary details as shown below
Finally, click the Add View button to save the view. All views you create will be available under the Assessment Views pane. In the next section, we will explain how to access and execute the Assessment Views.
To execute the assessment, you need to click on “Assessment Views” menu on top action bar and then expand assessment view you created:
As shown, we have several assessment views created for each technology/tenant, with some assessment views belonging to different customers. To begin the assessment for a technology included in the assessment view, expand the view and click on the Assessment Console action item:
When you click on Assessment Console, you will see the execution log and a spinning circle if the assessment is already in progress.
To start the assessment, click the PLAY icon on the right side of the screen. However, please note that some technologies do not support the “Enter Credentials in Prompt” option. When you click the PLAY icon, the process will prompt for confirmation before starting the assessment.
Applicable to Microsoft 365 Assessments
Note that if you are conducting an assessment for Microsoft 365 and the selected credential option is “Enter Credentials in Prompt”, you will be prompted to check Admin Consent, as shown below:
It will display the list of permissions required by the account used to connect to the Microsoft 365 Tenant. If you are using the Global Reader account for the assessment, this account must be assigned to four specific M365 roles, as indicated in the screenshot above.
Once the assessment is completed, a report will be genrated which you can see by expanding the Assessment View and then clicking on the “Show Report” action.
Note that SecID can generate following reports:
To generate the HTML report, expand Assessment View and then click on “Show Report” which, in turn, will show the HTML Report as shown below:
You can expand each category in the report to see the tests associated with the category and then click on the Test to see the details:
Details of a test:
Note: You can export this report and send it to your management or customer as a single file.
The HTML report includes details such as affected objects, CIS Assessment Status, SmartProfiler Test Status, Manual Checks, and other relevant information.
If you would like to generate Word and Excel reports in addition to HTML reports, you will need to use SecID Reporter, a tool available on the desktop and installed as part of the SecID web app.
To generate a report for a Microsoft 365 Tenant, click on the Generate Report option found under the Assessment view:
Note that SecID for Microsoft 365 can generate both a Microsoft Word report and an Excel summary, which includes the list of affected objects for each test.
Click the Browse button to specify the report location, and check or uncheck the various options as explained below:
Once you have checked/unchecked required options, please click on “Generate Report” button. The process will take some time, and progress will be shown on the screen.
All CIS Tests that are covered by SecID can be found on CIS website. Note that SecID supports the latest CIS Version 3.0.
Try SecID, a unified tool to help with security evaluation across many Microsoft technologies.