SmartProfiler is a Desktop Application designed to perform security, health, risk and compliance assessment of Microsoft 365, Active Directory, Azure Virtual Desktop, and other technologies supported by SmartProfiler-SecID. When performing an assessment of technologies, the SmartProfiler requires necessary permissions to the Assessment target.
M365 CIS Assessment support two connection methods; Executing Assessment by Entering Credentials in MS Authentication Prompt and STORED-CRED. There are two types of apps that SmartProfiler can utilize to make connections with M365 Services; Built-In Microsoft Graph PowerShell or Custom Entra App.
SmartProfiler cannot generate an Entra App automatically with necessary permissions – we need you to create a custom App and then apply those permissions depending on the authentication method you select.
M365 Assessment supports two connection methods:
Entering Credentials in MS Login Prompt
STORED-CRED
Executing Assessment by Entering Credentials in MS Login Prompt
The MS Authentication Prompt connection method can be used when you want to execute M365 CIS Assessment using a Global Reader or Global Admin Account. Please note that not all tests can be executed using the Global Reader account unless Global Reader account is part of certain M365 Roles.
Using a Global Reader account
If you plan to execute M365 CIS Assessment using a Global Reader account, then make sure Global Reader is part of below Microsoft 365 roles:
If you are using a Global Admin for M365 CIS Assessment, then no need to add user to any of the M365 roles. Note that you will be prompted to enter credentials 6-7 times if you use “Entering Credentials in MS Authentication Prompt” connection method.
Executing Assessment using STORED-CRED Connection Method
The STORED-CRED Connection method can be used if you:
Note that you will still be required to use a Global Admin or Global Reader account if you plan to use STORED-CRED option and Global Reader or Admin account must be a non-MFA account.
To use the STORED-CRED option you are required to create an Entra App and assign the following permissions to the Entra App:
And “Reader” IAM role has been assigned to Entra App to the subscription.
Once you have meet above requirements, you can proceed with next steps.
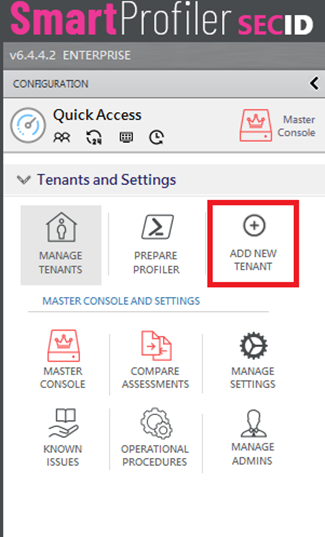
To register Microsoft 365 Tenant with SmartProfiler-SecID, please expand Tenants and Settings Section in left pane and then click on “Add New Tenant” button as shown below:
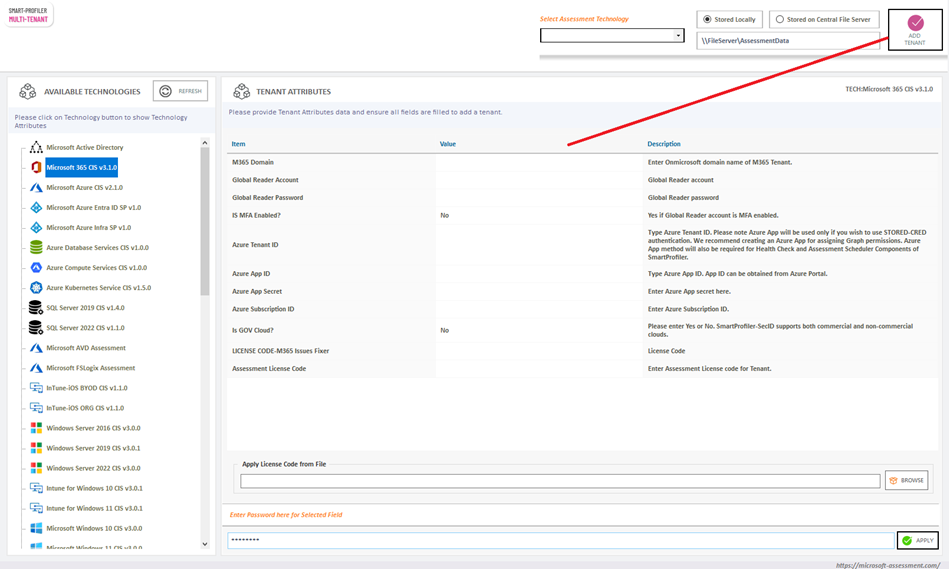
Then in the register a new tenant, select Microsoft 365 in the list of available technologies and provide the Tenant details as below:
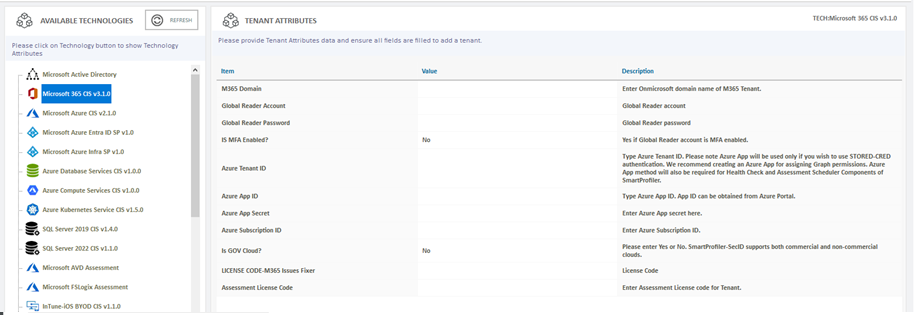
SmartProfiler requires below inputs for M365 Tenants:

If you have purchased M365 CIS Assessment license, then click on Browse button to apply the license codes from the license file.

Note that the registration process for a Microsoft 365 Tenant will actually check the status of the Microsoft 365 domain entered and global admin account to ensure domain is verified and global admin account has access to the tenant.
Once done, click on “Add Tenant” button to add tenant under the management of SmartProfiler.
Note that you need to create an assessment view before the assessment can be executed. To create an Assessment View, expand Tenants and Settings section in left pane and then click on “Manage Settings” button:
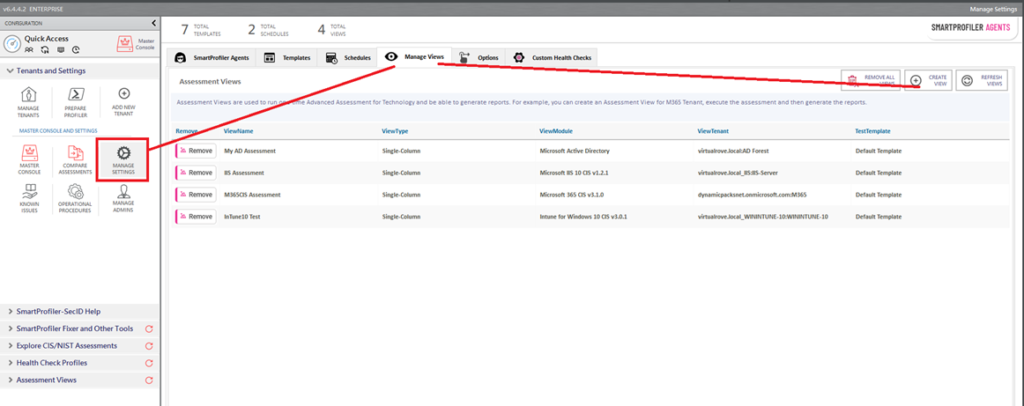
And then click on “Create View” button. In the Create a New View Window, provide the following inputs:
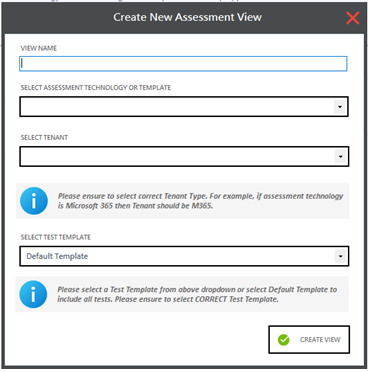
Once you have provided details for a new Assessment View, click on “Create View” button to create the view.
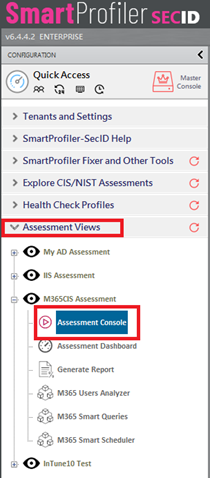
Once the Tenant has been registered with SmartProfiler and you have create an Assessment View, you can expand “Assessment Views” section in the left pane to see your view, expand the Assessment View and then click on “Assessment Console” to open the assessment console as shown below:
After clicking on Assessment Console, you will see list of tests available in console.

Admin Consent
Note that if the Admin Consent is not granted, the below screen will show “Not Granted” in red color. Please note that Admin Consent is only required if you plan to use “Entering Credentials in MS Authentication Prompt” connection method.

It is important to grant admin consent to run some of the tests which require permissions to connect to Microsoft 365 Tenant.
Granting Admin Consent
There are three ways to grant Admin Consent:
Note: Admin Consent process is a one-time process.
Using the SmartProfiler Admin Consent Process
SmartProfiler supports granting Admin Consent by executing a series of PowerShell commands. To grant Admin Consent using SmartProfiler, click on “GRANT” button shown below:

When you click on the button, you will be presented with a Microsoft Login Prompt to enter Global Administrator credentials and then will be asked to grant “READ-ONLY” permissions to Microsoft.Graph app.
By manually running PowerShell commands from SmartProfiler computer
If you do not want to use SmartProfiler-way to grant Admin Consent to Microsoft-Graph app then you can execute below PowerShell commands on the SmartProfiler computer.
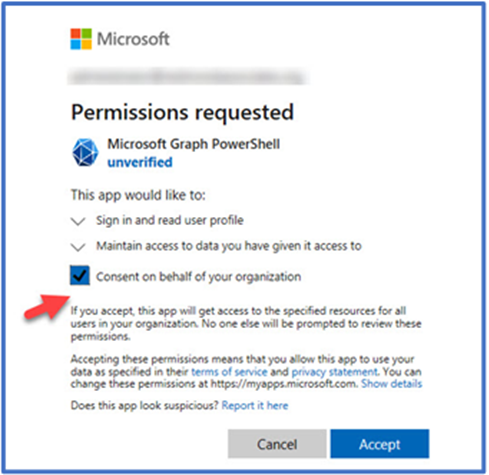
You need to check the box “Consent on behalf of your organization” and then click on “Accept” button to continue.
Once the Admin Consent has been granted to Microsoft.Graph all tests including tests in Mobile Device Management category can be executed using a Global Reader Account.
Using Azure AD Portal
If you would like to use Azure AD Portal to grant permissions for Microsoft.Graph, please go to Enterprise Applications in Azure portal and then apply those permissions to Microsoft.Graph PowerShell app.
Executing CIS Assessment
To start the execution, select the credential from the credential dropdown:

And then click on “Execute Assessment” button to start the M365 CIS Assessment.
Note that SmartProfiler for Microsoft 365 not just supports executing CIS Tests, it also supports executing various tests designed by our Microsoft 365 Expert Team. To give you an overview of the tests that we have included in the SmartProfiler are explained below:
Note that SmartProfiler execution console provides executing below tests:
While the assessment is in progress, you can see the assessment progress in the top bar.
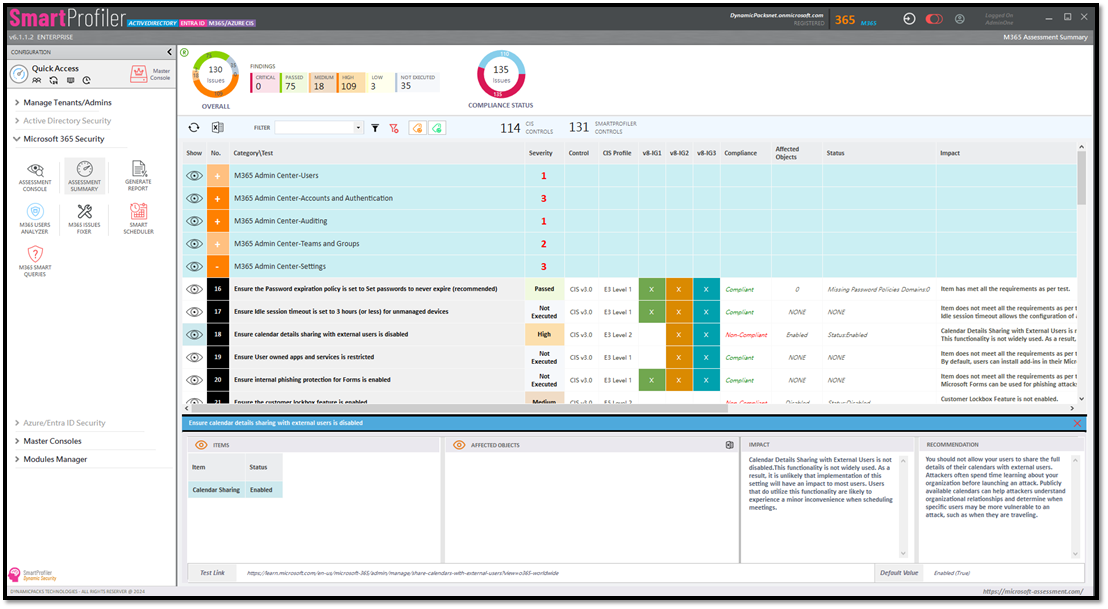
In the Assessment Summary window, you can see the issues that were detected for Microsoft 365 Tenant and impact and recommendation for each issue. When clicked on “Assessment Dashboard” tree node found under the Assessment View, the summary window will populate all issues in each Microsoft 365 Assessment category as shown below:

As you can see in the screenshot above, SmartProfiler has reported high, medium, low and non-compliance issues. It has also reported the items that have been passed successfully. If you need to see data for a test, click on test.
Here are the columns that are displayed as part of the Microsoft 365 Assessment and their meaning:
Note: SmartProfiler for Microsoft 365 includes all CIS Control tests for Microsoft 365 foundation. However, some of the tests have been designed by our Microsoft 365 experts to ensure every aspect of Microsoft 365 Subscription is checked and reported as part of the report.
To generate a report for Microsoft 365 Tenant, click on “Generate Report” node found under Assessment View in left pane.
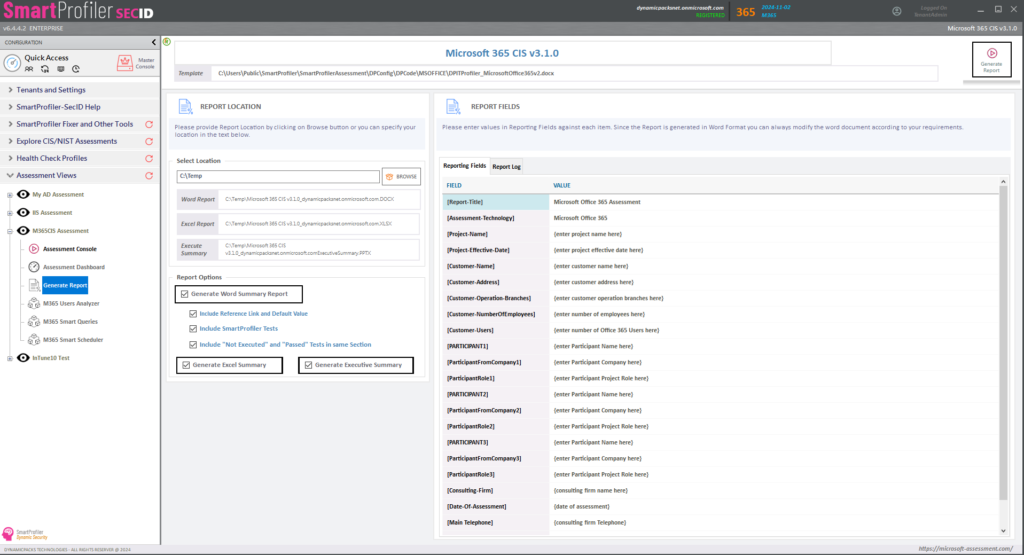
Note that SmartProfiler for Microsoft 365 is capable of generating a Microsoft Word Report and an excel summary which contains the affected objects list for each test.
Click on the Browse button to specify the report location and check/uncheck various other options as explained below:
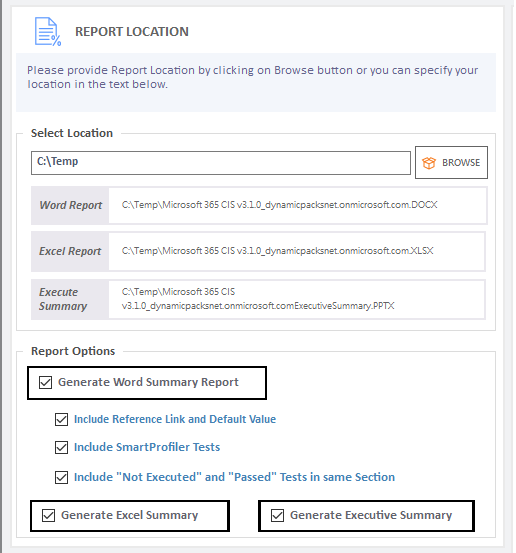
Once you have checked/unchecked required options, please click on “Generate Report” button. The process will take some time and progress will be shown on the screen.
All CIS Tests that are covered by SmartProfiler can be found on CIS website. Note that SmartProfiler supports latest CIS Version 3.1.0.
Try SmartProfiler, a unified tool to help with security evaluation across many Microsoft technologies.